Your Oura Ring delivers a sleep score each morning, but the number alone won't tell you why you woke up groggy or what to change tonight. Many users chase a perfect score without understanding which components - total sleep, efficiency, restfulness, REM, deep sleep, latency, and timing - actually correlate with how energized they feel the next day. This guide walks you through interpreting each element of your Oura sleep score, identifying the metrics that predict your energy levels, and distinguishing meaningful trends from single-night noise.
Sleep scores compress complex data into one figure, which can obscure important tradeoffs. A night with high efficiency but short duration might score well yet leave you fatigued, while a longer, less efficient night could deliver better recovery. Understanding these nuances helps you adjust bedtime routines, light exposure, meal timing, and activity load in ways that support genuine rest rather than simply raising a number.
This article focuses on practical interpretation: reading your score breakdown to spot patterns, recognizing when a dip reflects real recovery debt versus natural variation, and deciding when to modify habits versus accepting your body's current needs. By the end, you'll know which Oura metrics to prioritize for sustained energy, how to use weekly trends instead of daily scores, and when to treat your ring as a feedback tool rather than a strict coach.
Who This Guide Is For
This guide is for Oura Ring users who want to turn sleep data into better energy, but aren't sure which metrics actually matter or what their scores mean day to day. If you've checked your sleep score, seen a number in the 70s or 80s, and wondered whether that's good enough - or which part of the score to focus on first - this is for you.
You don't need to be a data scientist or sleep expert. You just need to know how to read the components that predict how you'll feel when you wake up, and which habits move those numbers in the right direction. This guide walks through the sleep score breakdown, explains what each metric reflects about your recovery, and shows you how to adjust routines based on real patterns in your data.
This is not a clinical sleep disorder assessment tool. If you consistently see very low scores, feel exhausted despite adequate time in bed, or suspect a breathing or sleep disorder, talk to a healthcare provider. This guide is for interpreting everyday variation in your sleep score and using that insight to build more consistent energy and recovery.
What Your Oura Sleep Score Actually Measures
The Oura Ring sleep score is a composite metric built from six core contributors that together reflect how restorative your night was. Understanding what the algorithm measures - and how each element is weighted - helps you focus on the inputs that matter most for next-day energy rather than chasing a single number.
Total sleep time tracks how many hours and minutes you spent asleep across all stages. Oura prioritizes duration because even high-quality sleep stages cannot fully compensate for chronic undersleeping. For most adults, the algorithm expects seven to nine hours; falling short consistently pulls the score down regardless of efficiency.
Sleep efficiency divides total sleep time by total time in bed. High efficiency - typically 85 percent or above - indicates you fell asleep relatively quickly and stayed asleep without long awake periods. Low efficiency may signal difficulty falling asleep, frequent wake-ups, or lying in bed awake at the beginning or end of the night.
Restfulness measures the number and duration of movement and interruptions detected by the ring's accelerometer. Frequent tossing, turning, or brief arousals reduce restfulness even if you do not consciously remember waking. This contributor flags fragmented sleep that prevents deep recovery cycles from completing.
REM sleep and deep sleep are each tracked as separate contributors. Oura reports both the total minutes and the percentage of your night spent in each stage. REM supports memory consolidation and emotional regulation, while deep sleep drives physical recovery and immune function. The algorithm does not expect equal amounts every night - sleep architecture naturally varies - but persistent shortfalls in either stage will lower your score and correlate with reduced alertness and mood stability.
Sleep latency is the time it takes to fall asleep after you get into bed. Oura considers 15 to 20 minutes optimal; falling asleep in under five minutes often suggests sleep debt, while latency beyond 20 minutes may indicate stress, caffeine, or poor wind-down habits.
Sleep timing evaluates alignment between your sleep midpoint and your body's circadian rhythm. Oura learns your typical schedule and flags nights when your sleep window shifts significantly later or earlier. Misalignment - common after travel, shift work, or late social events - can degrade sleep quality even when duration and efficiency appear normal.
Each contributor is weighted differently, and the weights are not published in exact percentages. Oura's algorithm prioritizes total sleep and efficiency most heavily, followed by restfulness and the two restorative stages. Latency and timing carry smaller weights but become more influential when they deviate sharply from your baseline. The result is a nonlinear score: improving a weak contributor often yields larger gains than optimizing an already strong one, and a single poor night in one dimension does not collapse the total if other factors remain stable.
The composite sleep score reflects context, not an absolute standard. Two people with identical scores may have reached them through different combinations - one with excellent efficiency but shorter duration, another with average efficiency but strong REM and deep sleep. This design means your score is most useful when tracked over weeks to identify patterns, not compared in isolation to a friend's single night or treated as a pass-fail threshold.
Which Metrics Predict Next-Day Energy Most Reliably
Total sleep duration, sleep efficiency, and restfulness are the three components that most reliably predict how energized you'll feel the next day. When these numbers are high, you're more likely to wake up alert and perform well cognitively throughout the morning. Sleep duration provides the raw time your body needs for physical repair and memory consolidation, while efficiency reflects how much of your time in bed was actually spent asleep rather than awake or restless. Restfulness captures movement and disruptions during the night, which directly influence whether sleep feels restorative or fragmented.
REM and deep sleep percentages contribute to your overall score, but their impact on next-day energy is less consistent from night to night. A single night with lower-than-usual REM or deep sleep rarely translates to noticeable fatigue if your total sleep and efficiency remain solid. These stages become more meaningful when tracked over a week or longer, as chronic shortfalls can signal recovery deficits or stress patterns that eventually affect performance and mood.
Sleep latency and timing influence your Oura score by reflecting circadian alignment and how quickly you transition into sleep. However, falling asleep in five minutes versus fifteen minutes typically doesn't determine how you feel the next day unless the delay becomes a chronic stressor or pushes your bedtime so late that total sleep suffers. Similarly, consistent sleep timing supports long-term energy regulation, but a single night shifted by an hour won't reliably predict a drop in energy if the other core metrics stay strong. Focus on duration, efficiency, and restfulness as your day-to-day energy indicators, and use the stage breakdowns and timing data to spot longer-term trends that may require habit adjustments.
How to Read Your Sleep Score in Context
A single night's sleep score offers a snapshot, but your weekly average reveals the pattern that drives how you feel. Rather than reacting to one low score, track your numbers over seven days to spot trends - consistent improvement or decline matters more than daily fluctuations. Most Oura users find their personal baseline by noting which score range aligns with days they wake up refreshed: for some, 75 feels excellent; for others, 82 is the threshold for peak energy.
External factors - work stress, time-zone travel, a head cold, or an unusually hot bedroom - can drop your score by 10 to 20 points without signaling a sleep disorder. When you see a sudden dip, compare it to your calendar and environment before changing your entire routine. If the lower score coincides with a known stressor and rebounds within two or three nights, it's context, not a crisis.
Trend analysis means looking for patterns across weeks, not perfection every night. If your seven-day average holds steady near your baseline even with one or two off nights, your sleep health remains on track. Conversely, a gradual decline over multiple weeks - even if individual scores stay above 70 - suggests it's time to review bedtime, light exposure, or evening habits. Use the app's trend view to compare monthly averages and identify which changes moved the needle, then repeat what worked rather than chasing a perfect score every single night.
Adjusting Your Habits Based on Sleep Score Insights
Once you understand which sleep score components are limiting your energy, the next step is to match each insight to a specific, evidence-based habit adjustment. Total sleep is often the easiest lever to pull: if your score is dragged down by fewer than seven hours in bed, protect your sleep opportunity by setting an earlier wind-down alarm or moving non-negotiable commitments. Efficiency problems - waking frequently or lying awake for long stretches - usually respond to sleep hygiene and stimulus control: keep your bedroom cool and dark, reserve the bed for sleep only, and if you're awake for more than twenty minutes, get up and return when drowsy. Restfulness reflects how much time you spent in light sleep or how often your heart rate and movement spiked during the night; common culprits include late caffeine, alcohol within three hours of bed, high stress, or a warm sleep environment. If your timing score is consistently low, your circadian rhythm may be misaligned - try morning bright light exposure within thirty minutes of waking, keep your bedtime and wake time consistent within a thirty-minute window every day, and dim lights two hours before bed. Focus on the one or two metrics that drop your score most often rather than trying to optimize everything at once. Track one change at a time for at least five to seven nights so you can see whether the adjustment moves your score and, more importantly, whether you feel more energized the next day. The Oura app trends view helps you spot patterns, but your subjective energy and mood remain the ultimate validation that a habit is working.
When a Low Score Doesn't Mean Poor Recovery
A low Oura Ring sleep score doesn't always mean you had poor recovery or that you'll feel sluggish the next day. The algorithm doesn't capture every aspect of your rest, and several common scenarios can produce misleading scores even when your body recovered adequately. Understanding these gaps helps you avoid over-interpreting a single number and keeps your focus on how you actually feel.
The ring only tracks sleep while it's on your finger, so daytime naps won't appear in your overnight score. If you took a 90-minute nap in the afternoon and slept six hours at night, your score will reflect only those six hours - even though your total sleep time was seven and a half hours. Similarly, shift workers or people with split sleep schedules may see lower scores because the algorithm expects consolidated overnight sleep and may not recognize two separate sleep sessions as a complete recovery cycle.
Movement detected during the night can lower your score, but not all movement indicates poor sleep quality. If your partner shifts in bed or your pet jumps on the mattress, the ring may register that vibration as restlessness. Light sleepers who wake briefly but fall back asleep quickly may also see fragmented data that drags the score down, even though those micro-wakes didn't meaningfully disrupt recovery.
Individual variation in sleep need matters more than the score suggests. Some people function well on seven hours while others need closer to nine, and the ring's baseline assumptions won't match everyone perfectly. A score of 70 might accompany excellent energy for one person and fatigue for another, depending on personal sleep requirements and how well the ring's model fits your physiology.
The most reliable approach is to compare your score against your subjective markers: mood, focus, physical readiness, and performance during the day. If your score is 68 but you feel sharp and energized, trust your body's signals. If your score is 85 but you're dragging, look at the component metrics - total sleep, deep sleep, REM, and heart rate variability - to identify what might be off. Treat the score as one data point in a larger picture, not a verdict on whether your recovery was successful.
Combining Sleep Score with Readiness and HRV Data
Your Oura Ring sleep score is most useful when viewed alongside your Readiness score and heart rate variability (HRV) trends, which together reveal whether your body is truly recovered. A high sleep score with a low Readiness score often signals that non-sleep factors - such as training load, early-stage illness, or psychological stress - are limiting your energy reserves, even if you slept well by duration and efficiency metrics alone.
HRV is particularly sensitive to overall stress and autonomic nervous system balance. When your sleep score is strong but your HRV is lower than your personal baseline, consider reducing high-intensity activity, prioritizing lighter movement, and checking for hidden stressors like hydration, nutrition timing, or unresolved tension. Conversely, a moderate sleep score paired with rising HRV and a solid Readiness score suggests your body is adapting well, and you may feel better than the sleep number alone would predict.
Discrepancies between these metrics are decision signals, not contradictions. If sleep quality was poor but Readiness remains high, you may have extra resilience from recent rest days or lower overall stress. If both sleep and Readiness are low, treat it as a clear cue to dial back intensity, extend your sleep opportunity window, and avoid decisions that require peak cognitive or physical performance. Layering these data streams turns a single night's sleep score into a contextualized recovery profile that guides realistic daily planning.
Track patterns over several days rather than reacting to isolated numbers. A single night of low sleep with stable HRV and Readiness may reflect a scheduling issue rather than true fatigue, while consecutive days of misaligned scores suggest cumulative strain that requires intentional recovery strategies.
Final Takeaway: Use the Score as a Tool, Not a Report Card
The Oura Ring sleep score works best when you treat it as feedback, not a grade. Instead of judging each night in isolation, look for patterns across a week or more - consistent drops in efficiency, frequent restlessness, or shortened deep sleep often reveal habits worth adjusting before a single low score ever does.
Start by establishing your personal baseline: track how different scores correlate with your actual energy, focus, and mood the next day. You may discover that an 82 after seven hours of consistent sleep leaves you sharper than a 90 following eight hours of fragmented rest, or that your body prioritizes REM duration over total time. These insights matter more than hitting an arbitrary target every night.
Focus on the factors you control - bedtime consistency, room temperature, light exposure, and pre-sleep routine - and use score components to test small changes. If latency climbs after late meals, adjust dinner timing for a week and compare. If efficiency drops on nights you scroll before bed, replace that habit and watch the trend. The score becomes useful when it confirms what works for your schedule and biology, not when it adds stress over outcomes you can't change in the moment.
Ultimately, subjective experience should guide your decisions. A lower score paired with genuine energy and clear thinking means your recovery is on track, while a high score masking fatigue or brain fog signals a need to look deeper - at stress, nutrition, or daytime activity - rather than chasing the number itself. Use the Oura sleep score to spot opportunities and validate progress, and let how you feel determine whether your sleep strategy is truly working.
Common Mistakes When Interpreting Oura Sleep Data
- Chasing a perfect 100 score instead of identifying your functional range
- Ignoring how you actually feel in favor of what the app says
- Overreacting to one bad night instead of tracking weekly patterns
- Assuming all sleep stages need equal percentages every night
- Overlooking restfulness and efficiency in favor of total hours alone
- Using the score to diagnose sleep disorders without professional assessment
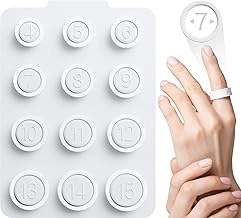
Oura Ring 4 Sizing Kit, Sizes 4 to 15
Proper fit matters when tracking sleep metrics that depend on continuous skin contact. The Oura Ring 4 Sizing Kit helps you identify the right size before committing to the full device, ensuring the sensors stay positioned correctly throughout the night for consistent heart rate, restfulness, and temperature readings.
This kit includes twelve plastic ring sizers covering sizes 4 through 15, allowing you to test fit on different fingers and compare comfort during daily activities and rest. Since the Oura Ring collects data continuously, even small gaps between the sensor and your skin can affect the accuracy of metrics like heart rate variability and resting heart rate - two components that directly influence your sleep score and next-day energy readiness.
At $8.99, the sizing kit is a low-cost step that reduces the likelihood of needing an exchange later. Wear the sizer for at least multiple, including overnight, to confirm the fit feels stable without tightness or slipping. The ring should sit snug enough to maintain sensor contact but loose enough to avoid discomfort during finger swelling that occurs naturally during sleep.
Choose the size that balances comfort and stability across different times of day, prioritizing the finger you plan to wear the ring on long-term. A correct fit from the start supports reliable sleep tracking and makes it easier to interpret score fluctuations based on actual recovery patterns rather than inconsistent data.
- ✅ Covers twelve sizes (4 - 15) to test fit across multiple fingers
- ✅ Affordable at $8.99 to confirm sizing before purchasing the full ring
- ✅ Helps ensure stable sensor contact for accurate heart rate and sleep metrics
- ⚠️ Plastic sizers may not fully replicate the weight or feel of the actual ring
- ⚠️ Requires wearing for 24+ hours to assess fit during natural finger size changes
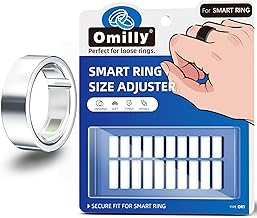
Smart Ring Size Adjuster for Oura Gen 3/4, Samsung Galaxy, Ultra Human Air, RingConn, Amazfit
When your ring fit changes due to temperature shifts, hydration levels, or weight fluctuations, sensor contact becomes inconsistent - and that can throw off the restfulness and efficiency components of your sleep score. If you've noticed your Oura Ring feels loose in the morning or tight at night, a size adjuster offers a low-cost fix without replacing your ring.
The Smart Ring Size Adjuster is compatible with Oura Gen 3 and Gen 4, Samsung Galaxy Ring, Ultra Human Air, RingConn, and Amazfit models. It's designed to reduce ring movement during sleep, helping maintain stable sensor positioning on your finger. Priced at $8.99, it's a practical option when your ring size sits between the standard sizing kit increments or when daily fit varies enough to affect data quality.
This adjuster works by creating a tighter fit around the band, which can help if you've noticed gaps between your skin and the sensors - especially during cooler nights when fingers naturally contract. Stable contact supports more accurate heart rate variability and movement tracking, both of which feed into your readiness and sleep efficiency metrics. If your sleep score has been inconsistent despite stable habits, fit may be the variable worth addressing first.
The tradeoff is comfort: a tighter fit may feel restrictive if you're sensitive to pressure on your finger, and over-tightening can reduce circulation or cause discomfort during the night. Start with minimal adjustment and monitor how your skin responds. If your ring already fits snugly most of the time, this accessory may be unnecessary - it's best suited for users experiencing noticeable day-to-day size changes or those between standard ring sizes.
- ✅ Compatible with Oura Gen 3/4, Samsung Galaxy Ring, and other major smart ring brands
- ✅ Affordable at $8.99
- ✅ Helps maintain sensor contact when ring fit fluctuates
- ✅ Useful for users between standard ring sizes
- ⚠️ May feel restrictive if over-tightened
- ⚠️ Not necessary if your ring already fits consistently
- ⚠️ Requires trial and adjustment to find comfortable tension
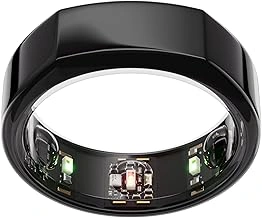
Oura Ring Gen3 Heritage Smart Ring - Black, Size 6
The Oura Ring Gen3 Heritage Smart Ring is the device that powers the sleep score metrics discussed throughout this guide. Worn on your finger, it tracks sleep stages, heart rate variability, resting heart rate, body temperature, and movement - feeding all of that data into the daily sleep and readiness scores you see each morning.
This model combines continuous tracking with a discreet form factor, making it practical for users who want detailed recovery insights without wearing a watch to bed. The Gen3 measures your light, deep, and REM sleep duration, which directly inform your sleep score, and its HRV and temperature sensors help calibrate your readiness score for the day ahead.
At $349.00, the Oura Ring Gen3 is positioned for users serious about data-driven recovery and energy optimization. The ring requires an Oura membership (sold separately) to access full metrics and trend analysis, so factor that ongoing cost into your decision. The 4.3/5 rating reflects strong performance in sleep and recovery tracking, though fit and comfort vary by finger size and personal preference.
If you're looking to move beyond guessing why you feel tired and want a clear, repeatable way to connect sleep metrics to next-day energy, the Gen3 provides the foundation for that process. It won't tell you what to do, but it will show you which nights deliver the recovery you need.
- ✅ Tracks sleep stages, HRV, resting heart rate, and body temperature in one device
- ✅ Discreet ring form factor suitable for all-night wear
- ✅ Generates daily sleep and readiness scores for actionable recovery insights
- ⚠️ Requires separate Oura membership for full metrics and trends
- ⚠️ Fit and comfort depend on correct ring sizing and finger preference
- ⚠️ $349.00 upfront cost plus ongoing subscription